#BLOGTOBER Day 28- Purple/Green/Black Rocker Chic Witch Costume Idea

This year is my niece’s first time Trick -or- Treating so I am going to be going with her. So naturally, me always down for a reason to dress up- after many laps around Spirit Halloween I walked out with a witch hat and a spider ring. 

I figured I just needed a few accent pieces, because I knew I had enough black clothing at home, and I knew I could make something creative with fun makeup and nail art.

So the creative wheels started and I decided on a Purple/Green/Black color theme. When I think of witches I think of those three colors. Their tights are usually purple and green stripped, their faces green. So I figured why not make it a funky witch theme.

Let’s start with the basics…

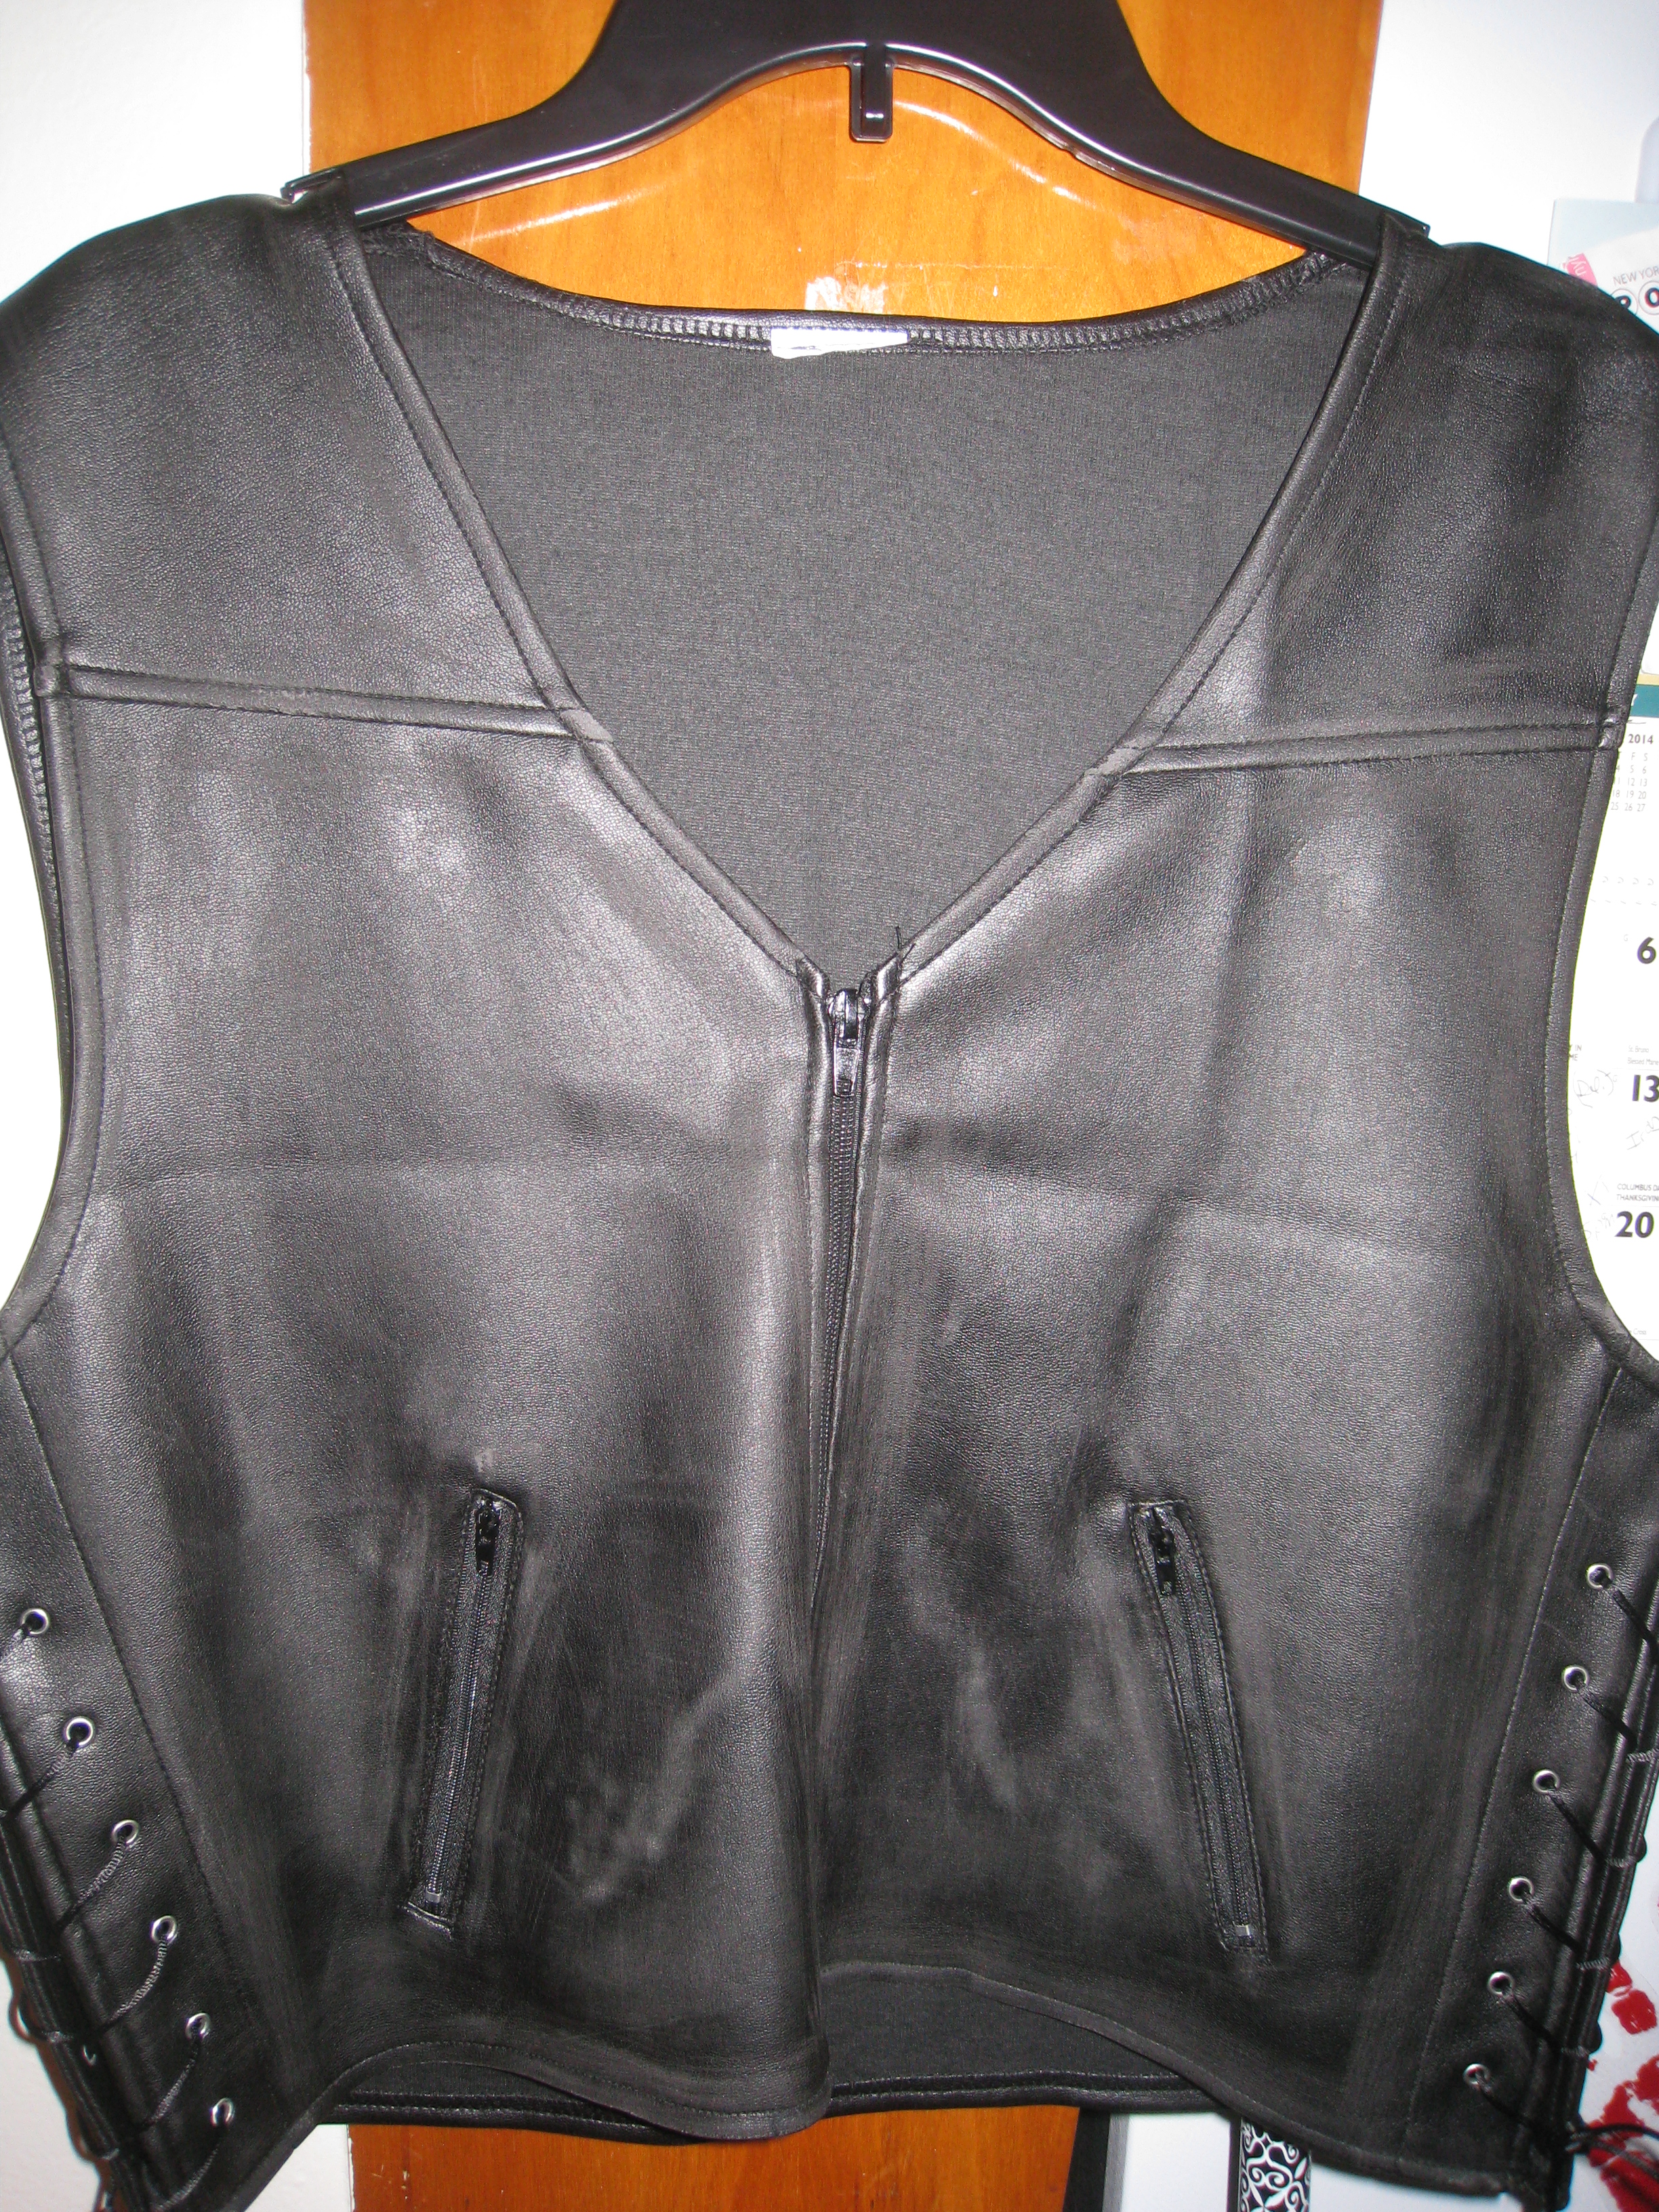
The Black Base- I wanted this to be more of a Rocker Chic Witch Look

So we have to have the leather jacket, the black pants, and the combat boots. These two clothing pieces have been so well worn! I feel like I go for them ALL THE TIME. Every girl has those one pair of black pants that she feels like she can conquer the world in. #BootyLookGoodPants  😉 

20181028_170125

I will probably just wear a black long sleeve or black t-shirt. Depending on the weather. If I had more time I would have searched for a purple & green stripped tee. But all black with color accents is always super cool, if you ask me. So that’s the way I’m choosing to rock this glam rocker witch look. 

20181024_003204

The trusty old combat boots, I’ve had for years.

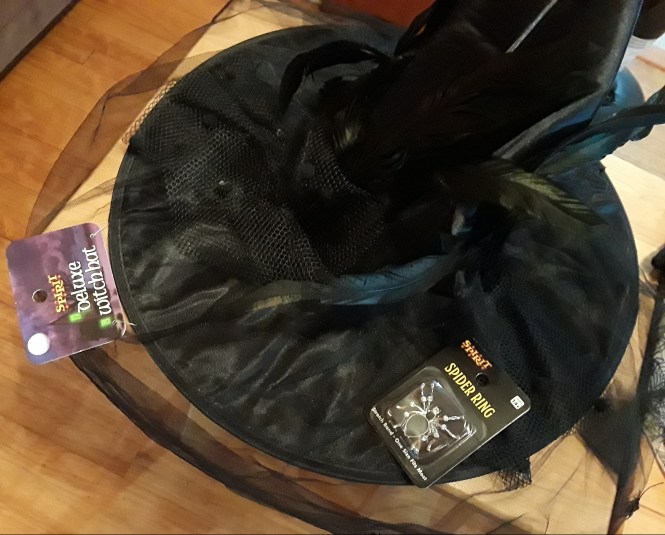
The Witch Hat & Spider Ring [Sprit Halloween] 

Hat- $14.99 

Ring- $7.99 

^ I tried to link these items for you guys, in case you wanted to pick them up for your own witch look for next year, but I couldn’t find them on the site. But they had a bunch others, click and browse the site!

20181028_170038

They had a huge witch section- makeup, jewelry, brooms, costumes. I’m not a fan of costume Halloween makeup. I have sensitive skin, so I know it’ll probably mess with my face. Besides, everything was so expensive. As it is I walked out spending about $25 just for a hat and a ring!

But I really do like this hat, its got these really cool black feathers that glisten a green/purple hue, and it has a veil that hangs over the face with a bunch of spiders all over it. The spider ring was an impulse buy near the register. I was looking for an extravagant spider ring but I didn’t see any in the witch section, then I found this one on the way out and loved it. 

So with these two pieces in mind, I set out to researching the fun stuff Makeup & Nail Ideas. I wanted a really fun glam witch look. No full green face for me! 😉 

Makeup Inspirations- [via YouTube Tutorials] 

Links Below: 

GREEN & PURPLE LOOK FULL FACE

PURPLE LOOK 

^I really like the ombre lip look

LIME GREEN & PURPLE LOOK

GREEN SPIDER WEB EYE LOOK

Nail Art Inspirations– [via Google & YouTube] 


Screenshot_20181026-094949_Google

Makeup & Nail polish I bought to complete this look-

20181028_165949

20181028_165943

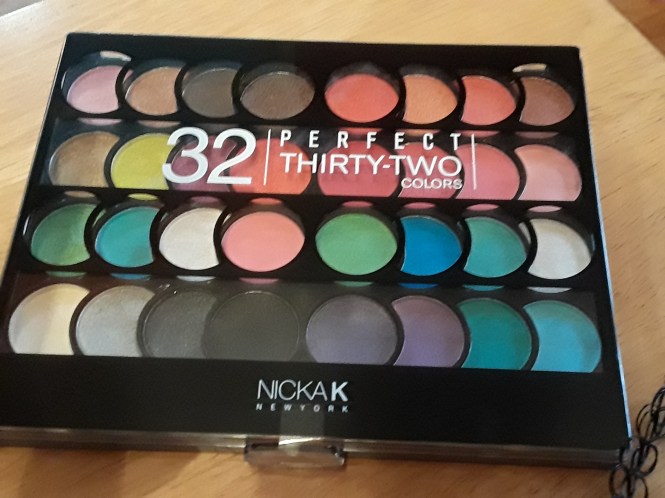
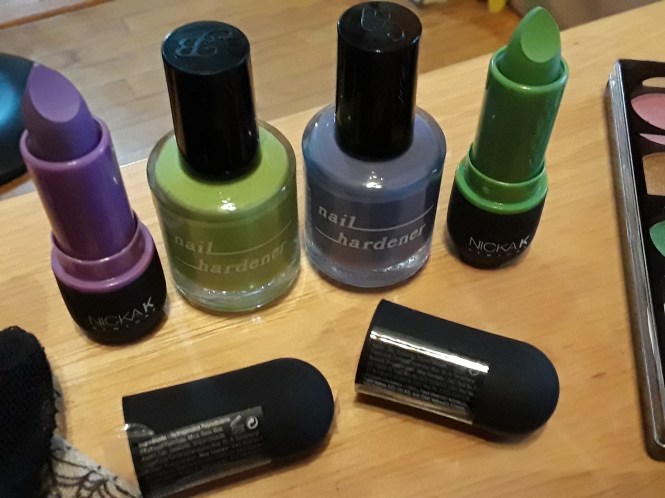
NICKAK NEW YORK lipsticks in Violet & Lime BRUCCI Nail polish in Sylvia’s Pretty In Purple & Stephanie Go Lime 

Accessories I had, that I plan to use to spruce up this witch look-


20181028_165931

I have some lace gloves, some various bracelet and choker necklace options. Some Silver hoops, some black sunglasses. I also have a silver bracelet/ring piece with a moon on it which I thought was kinda witchy so we’ll see if I want to rock that. And not sure yet if I want to throw on this spider web scarf too.  

20181028_170003

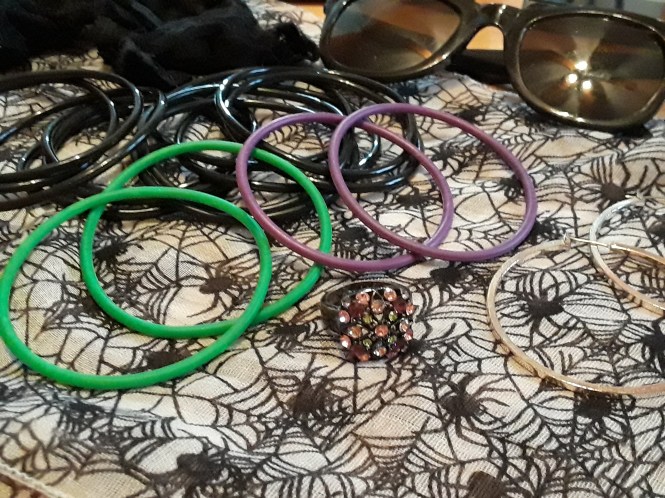
This ring has the colors in it, but I may not want to wear any other rings, because that spider ring can be a stand alone piece! LOL. We shall see how it all gets pulled together. I usually end up making something work! 😀 

Hair-

I was also going to curl my hair and add in some purple and green hair extensions, but I couldn’t find the right color shades, and I didn’t really want to buy any sprays. So I decided that I’m going to just use the eyeshadow I have and just dust some on like hair chalk. Or if that doesn’t work, I can just use real sidewalk chalk. Its basically the same crap. HAHA. I’ll throw some hairspray to hold the color and boom!

COSTUME NOTES:

So what I usually end up doing is gathering inspiration and then I put my own spin on things and make up my own look. 

I’m sure if you didn’t want to rock a full witch hat you can also find a cute little hat clip, hat headband, or create a paper hat on your own. YouTube is full of tons of tutorials.

I chose pants, because I wanted to be comfortable, but you could totally do a black skirt or dress and find the striped tights, or a pair of fishnets. It’s totally customizable. Do your thang!

Honestly you can be really creative with a witch costume, you can even do all black, or red and black, or orange and black. Basically as long as you have a witch “hat” on, everyone will know what you are! 

Follow michelleleighwrites_blog on instagram for a full look costume reveal on Halloween! 

Happy Trick-or-Treating!


*All images are my own except the screenshots from the makeup and nail inspirations.* 

*I do not take credit for any videos used.* 

-<3-


15 Times Daryl Dixon Gave Us Butterflies While Being A BADASS!

imagesICHCF4QDSo the past few Sundays, AMC has been replaying each of the seasons of The Walking Dead. This past Sunday was a Season 2 marathon. Which I have to admit, is probably my favorite season. As I watched these old episodes, I am reminded of how much I love Mr. Daryl Dixon. If you follow my blog you know this, hence I was Mrs. Daryl Dixon for Halloween this past year. I did a tutorial on my costume and I even made his angel vest. It dawns on me every time I catch an episode on in the summer, that I miss this show so damn much. October 11, isn’t too far away, right?

IMG_0552

My Daryl Vest

15 Times Daryl Dixon Gave Us Butterflies While Being A BADASS!

**WARNING! Spoilers ahead, if you are currently behind, DO NOT read on.**

*I apologize for some of the videos, but these scenes were super hard to find. I did my best.*

15. The Transformation of his character, he’s come a long way… *shout out to whoever made this!

https://www.youtube.com/watch?v=yo-VOyEh5W0

14. Bromance; Rick & Daryl. “You’re my brother.”

13. Killing Dale, so Rick wouldn’t have to; “Sorry Brother.”

12. The epic “Morgue room” fight scene.

*clips of the scene @4:04 (this video is hysterical, whoever made this got the reactions down!)

https://www.youtube.com/watch?v=s1ZG_CaUR8I

11. Gives Beth her first drink.

*Spoiler Alert…He gives her Moonshine later…

10. Shooting the cop that shot Beth, and carrying Beth’s body out.

9. Motorcycles, Crossbows and Road Kill for breakfast-lunch- & dinner. (we’ve seen him kill/eat snakes, squirrels, rabbits, possums…the list goes on and on.)

https://www.youtube.com/watch?v=fChGCtgOTNE

“Brought Dinner.” haha

*And you can’t forget about the poncho…(because any guy who can rock an Indian printed poncho in the zombie apocalypse like a badass, is someone I wanna be friends with.)

tumblr_n284qpH7fO1s0sn5co2_r1_250[1]

8. His country boy slang/epic quotes.

7. Coming back to the prison just in time to save Rick.

6. Reuniting with Carol after the group was separated.

5. Saving Carol from walkers and the overrun burning barn.

*scene @ 2:52

4. Crying over the death of his brother Merle.

3. Flower for Carol, in honor of Sophia.

2. Searching for Sophia, and his intense determination to find her.

https://www.youtube.com/watch?v=vngTOuCNPVI

1. Feeding Baby Judith- whom he coined; Little Ass Kicker.

So if you watch the show, you know how well loved Daryl has become. He started off as a loud mouth, trigger happy, quick to act “redneck.” He didn’t care how he came off, and didn’t try to please anyone. But as you get to know him, even as early as season 1, we see his true heart. We see he cares about people. He continuously risks his life to keep others safe. He searched for Sophia, he saved lives over and over again. He forms friendship with Carol, Rick, and Beth. We see him take care of kids and women, especially. We see him resort to his anger and pushing people away when he feels he didn’t do all he could to protect his group. We see him become a leader, and Rick’s leading partner. We see him grow into a vital member of the group. Daryl’s transformation is outstanding. He is also funny as hell, his country boy lingo will crack you up. The things he comes out with. He’s definitely got some light funny moments in over the past 5 seasons. Daryl is a survivor, he has instinct and keen sense of what’s right. He’s always got some kind of plan. Knowing his childhood was an abusive one, only strengthens his character. He knows he is not without flaws, but at the same time, you can see he wants to do better than his father did. He wants to help people, and cares about people. Now I know there are a million other reasons why we all love Daryl Dixon, but I just thought I’d shed a light on a few. Can’t wait to see what he has in store for us this season. Hopefully a girlfriend, maybe? Because he deserves some love!

Hey AMC, I still have my Mrs. Dixon costume…I’m just saying 😉

***********************************************************

The Walking Dead Marathon continues this Sunday with Season 3.

All in preparation for their new sister show; Fear The Walking Dead.

Premiering Sunday August 23, at 9pm on AMC.

I’m thinking of doing a First Impressions Review of the Pilot episode.

New Episodes of The Walking Dead return Sunday October 11, at 9pm on AMC.

*I do not take credit for any of The Walking Dead videos, images, or gifs used.*

-<3-

Becoming Mrs. Daryl Dixon

In my last post I showed you how I DIY’d my leather vest to look like Daryl Dixon’s from The Walking Dead. Click HERE to view that.IMG_0552

But now I’m going to show you how I pulled the whole look together to become MRS. Daryl Dixon.

maxresdefault[2]

Create a bloody/dirty/worn out shirt…

to make it look like you’ve been slaying zombies left and right.

#18

What you will need…A light colored shirt, paper bags, fake blood, cotton balls, a bowl, some bronzer, red food coloring, and a paintbrush.

#20

First lay your plastic bags down before working.

Spread out your shirt.

Pour some of the bronzer powder into a bowl (I used bare minerals warmth).

Take your cotton ball and dip it into the bronzer and sparingly make your “dirt” marks all over your shirt.

My shirt was very sheer and actually had a shredded back to it so it looked really warn as is, and because it was sheer the markings went through to the back as well, which saved me some time.

Focus on the armpit areas and the neck to convey a worn sweaty/dirty affect. You’ve been traveling through a zombie apocalypse. This is not the time to be a fashionista.

#21

Next… bloody it up.

I didn’t go too crazy. I’m not the zombie…

541454_10200325946452480_358554082_n 544676_10100618626070467_1501873936_n

#BeenThereDoneThat

I’m the slayer.

So I was going for a more splattered blood #IJustKilledAFewWalkers look.

The fake blood I bought was a bit too thick to create a splattered affect so I used red food color and dipped a paint brush into it and shook it onto the shirt sparingly.

The more noticeable blood drips were achieved with the fake blood, and a paintbrush.

My brother took care of that part.

So once you get the right bloody/dirty look you hang the shirt up to dry over night. The thinner your shirt the quicker the dry time.

Now that you’ve made both your angel wings vest and your bloody shirt…you can pull from your own wardrobe for the rest of this look.

Including:

Vest

Leather Jacket

Sleeveless plaid button down

Bloody Shirt

Black jeggings

Black combat boots

The Full Look:

IMG_0544 IMG_0540 20141031_201428 20141031_201302

(A closer look at ) The Make Up & Hair:

20141031_193248

20141031_193712

I went for a really natural (grungy) look.

[Because let’s be real ain’t nobody got time for smokey eyes and bold red lips in the apocalypse.]

I did a basic face

bb cream

under eye concealer

curled lashes

very small amount of mascara

pinkish blush (flushed cheeks…run girl run save your ammo)

Fill in the eyebrows (no time for tweezing either haha)

Using bronzer to deepen all your features…basically highlight every crease in your face, cheek bones, nose, under eyes, etc. Basically darkening your features to make yourself look like you’ve been on the go weathering the struggle just trying to survive. Imperfections are okay.

For the lips I used a combination of a concealer stick and some darker burgundy lipstick, to create a flushed look.

For my hair (worked best on second day hair)

[ain’t nobody got time to wash their hair luxuriously when your tryna stay alive]

First I curled lightly with a straightener/curler

Then I went over with a curling iron

Hairspray in between as usual

Adding products as you see fit

Then once you get a wavy curl flip your head over shake it out

Comb out to loosen and give a more messy natural wave.

I ended up tying it into a side pony tail and leaving some pieces out

20141031_212245

I look pissed…haha #stayingincharacter

Accessories:

Handkerchief (I tied it to my belt hoop)

Some leather rope bracelets

A silver chain with a saint on it (because you still need to keep your faith in the zombie apocalypse)

fake tattoos (Daryl has a few)

I did start the night with a pair of lace “biker” gloves but eventually those came off, (Daryl wears leather ones sometimes and I had the lace pair so I made it work)

20141031_204958

I chose to put this one on my fore arm…

Daryl-dixon-tattoos-300x225[1]

Daryl’s tattoo

And if you really wanna commit to the role of Mrs. Daryl Dixon…throw in some fake bling 😉

20141031_195547

Hey if Maggie got a ring…Daryl’s girl can have one too…didn’t cost a thing 😉 P.S. I didn’t actually wear these out! haha

I stuck to clear nail polish because I wanted to stay as close to character as possible.

And can’t forget… a weapon of choice #fakeofcourse

I went with a fake bloody knife

IMG_0579

Oh well I guess she was bitten…

So there you have it…how to transform into Daryl Dixon’s wife.

It was fun playing the part, after all that’s what Halloween is about right….immersing yourself into a new character for a night and owning it.

AMC give me a call…Daryl deserves some love too!

Who’s ready for tonight’s episode…we finally get to see what happened to Beth!

Happy Watching!

-<3-

So now that I’ve been a zombie and a zombie killer…who’s next…maybe I’ll take on Michonne next year… What do you think?

michonne

DIY Daryl Dixon Angel Wings Vest

It’s no secret that I’m a Walking Dead fan, and it’s even less of a secret that I love Daryl Dixon. So imagesVS5URDH9 when Halloween costumes began rolling around in my brain I was considering being either Michonne or Daryl. However I didn’t like the quality of the Michonne wig they were selling and I knew I wouldn’t keep it on the whole night so I opted for Daryl. But Michelle you’re a girl….yes I’m well aware of that. But it’s Halloween and I can do and be what or whomever I want. You make your own rules. So I am [Female] Daryl Dixon….or Mrs. Daryl Dixon if you will. I even have the vest to prove. I’ll show you how I transformed into character…come along!

imagesPQK2V7XS

Phase 1: Materials & Creating the Wings

#1

What you will need…A leather vest (not too cheap in quality), some light colored fabric (preferably a beige color) that can be easily manipulated and cut, some white computer paper, and some tracing paper.

The fabric I bought was actually flexible/easier to cut and durable and glued nicely because it had a felt type back…keep that in mind when choosing your fabric.

The faux leather vest I used was from spirit Halloween…I found it in the “biker” section.

CLICK HERE for link.

#2

#5

Here is the evolution of Daryl’s signature wings…

First I found a printable template of his wings online. CLICK HERE for link.

Then I had my brother draw them out to scale.

***BE SUPER CAREFUL CUTTING THESE WINGS OUT, it’s a pain in the ass because it’s so intricate.***

Then I traced them onto the tracing paper and was able to rub that out onto the fabric giving me an outline to work with.

Don't mind my cookie monster shirt/my niece's book haha

Don’t mind my cookie monster shirt/my niece’s book haha

#7

Next the bro came in and traced over the stencil markings with a fine tip black sharpie marker and free handed the shading and details….thanks dude,

#8

Should look a little something like this…our tip for the opposite wing…turn over and trace the opposite side of wing and repeat process.

Phase 2: Gluing the Wings to the Vest

#11

What you will need…Hot glue gun, glue sticks, ruler, white crayon, and cardboard to put between the vest, to protect the other side when gluing.

#10

First place the cardboard between the vest.

Lay your wings onto the back of the vest and center them…using a ruler you can measure the distances from the sides, the top, the bottom, to make sure it’s all even.

When you’re all set, mark key points of where the wings go with the white crayon, this will help guide you if the wings shift during the gluing process.

Last but not least start gluing!

I recommend putting a dot of glue in the middle of each wing somewhere as to keep them in place while you glue the edges down and remember to be quick and careful. The clue dries quick and it’s hot as hell! [you will burn yourself about 5,000 times but it’s the price of wanting to look like a badass zombie killing genius]

Glue and stick, Glue and stick. Don’t try and glue too much at once, because the glue will dry before you get to do so. Seems like common sense but I just wanna cover my bases here.

cropped vest on

And when it’s all said and done it should look a little like this…

Phase 3: Distressing the vest…

to ya know make it look like you’ve been through the zombie apocalypse

I got some of my ideas from HERE

#13

You will need…A wire brush, sand paper, and that cardboard again.

Start will the sandpaper first making sure to scrap gently...too much will create more damage then you are looking for

Start will the sandpaper first making sure to scrape gently…too much will create more damage then you are looking for

Next use the wire brush...when using both tools focus more so on the seems...by the neck, the armpits the bottom...

Next use the wire brush…when using both tools focus more so on the seems…by the neck, the armpits the bottom…this is where it would be most worn out

There’s really no precise method I went back and forth between using these two tools and I was pretty satisfied with my distressed look…

#16 #17

It’s a little bit difficult to tell in these photos…but the vest did get distressed and the texture is rather nice now…and there’s definitely less shine. ALSO I left he wings alone….too much effort went into those suckers!

***********

QUICK PRICE COMPARISON:

The Daryl Vest in Spirit Halloween (too big on me anyway, it just looked silly) is cheaply made, and the wings aren’t that detailed and it’s $29.99

The Spirit Halloween biker vest was $16.99 and the fabric I used for the wings  was $7 in a local fabric store (for a yard of material) putting me at around $24…so I saved a few bucks and even though it was more work, I still think mine looks better and a hell of a lot more realistic I enjoyed doing it and creating something I can use and be proud of … 😀

So there you have it…my Daryl Dixon Vest DIY tutorial.

Shout out to my bro for helping me with the wings….it was definitely a team effort! 😀

What do you think?

I will be rocking this on Sundays!

I will be rocking this on Sundays!

Stay Tuned for my FULL outfit as I transform into Mrs. Daryl Dixon for Halloween.

Got my Cross Bow...

Got my Cross Bow…

Mom…I’m married for the night! 😉

-<3-